

A while back, I asked a question in my Instagram stories about taking photos with your phone. You guys responded with all kinds of great questions and I’m going to get to a few of them here, but I also put together a Guide to Great Photos with your Phone for you, launching October 1st, that shares the ins and outs of how I shoot with my phone, my best practices and some tips and tricks.
I’m an iPhone user personally, but not because it has the best camera (it doesn’t). I’m an iPhone user because I’m brand loyal. Which means that even as a photographer who wants to have the best gear available, I’m making moves to get the best shots possible with the camera in my pocket – my phone.
Last year, I had the incredible, once-in-a-lifetime opportunity to travel all expenses paid to Sydney, Australia to watch the Invictus Games and I was so confident that I could get great shots on my iPhone that I didn’t even pack my dSLR camera. Having a few tricks in your back pocket and some solid methods for shooting goes a long way!

While I’m going to share more of the ins and outs of my shooting style in the Guide, here I’ve put together a list of my top 5 game-changers for getting great shots with the camera in your pocket:
1. Clean the lens
I feel like this one should be obvious, but it’s often not. You don’t realize how many times a day you touch your phone and it’s inevitable that you (or your kids) are going to get fingerprints (or really anything) all over the camera lens.
2. Choose the right case
Bulky, full coverage cases are great if you’re planning on diving with your phone, but otherwise, there are plenty of cases on the market that provide full protection without adding an extra layer of plastic between your phone’s camera lens and the world outside.
That layer of plastic will get hazy over time creating less than clear images and even when it’s brand new, when light hits it and reflects into your lens it’s only degrading the quality and sharpness of your image. If you aren’t getting sharp images, your phone case is probably your biggest issue.
I personally use an Otterbox Symmetry case which covers the back side of my phone, and provides great protection while leaving the camera exposed. Then I also use a glass screen protector and a glass protector on my camera lens. Because there is no space between the lens and the glass protector, it doesn’t cause reflection issues or haze. And the best part.. when it gets scratched, I can just peel it off and replace it.
3. How you hold it
Another little addition to my phone is a ring on the back. I like this because it allows me to have greater control over the phone while I’m shooting. For nighttime photos, this is key. Notice how at night, your photos often end up blurry? A combination of not enough light + your natural movement makes for less than ideal conditions. Having the ring helps me to keep the phone steadier, but the best scenario for nighttime shooting is to sit your phone on a solid surface to shoot.
The other reason I love this ring is because it allows me to keep a great hold on my phone when I’m shooting while moving, shooting in or near the water where I’m afraid of losing my phone, or shooting at an angle, like when taking a selfie (and honestly while I’m just walking around, because I drop that thing constantly).
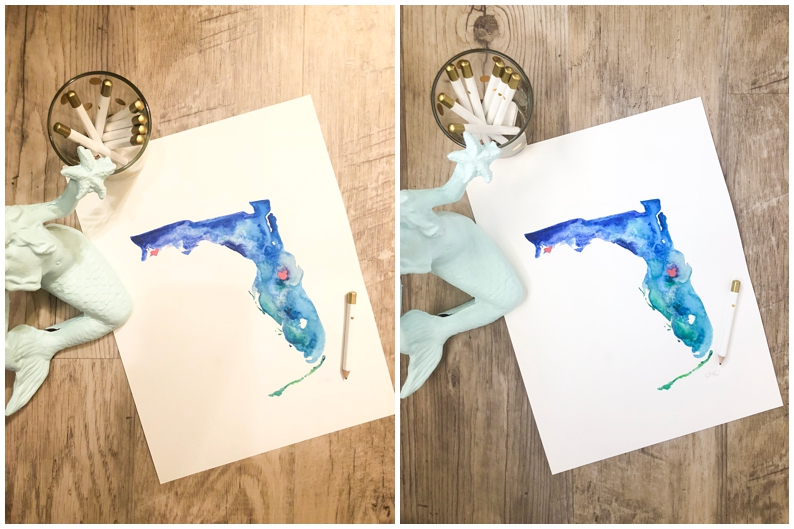
Here are some examples of shots made possible by having a secure way to hold onto the phone.

4. Shoot in the best light whenever possible
When you’re shooting candids, it’s not always possible to choose the light, but whenever possible, moving just a little bit into the best light is going to really take your photos to the next level. Natural light produces the best photos so if possible, turn off ambient room lights and open up the blinds or move toward windows.
When you’re shooting outside, shooting in direct sunlight midday when the sun is highest can create some really harsh shadows, especially in photos of people (hello raccoon eyes!) Moving to an area of open shade or even light is your best choice.
Here’s an example of the difference between an image shot in artificial light and an image shot in natural light.
5. Use the grid + balance the photo
If you struggle with composing your photos in a way that your eye finds appealing, a great rule of thumb is the Rule of Thirds. This rule basically says that your subject will appear on one of the grid lines or intersections as opposed to right in the middle, like the photo below left.
Personally I also like for my subject to take up a little more space in my photo than the background does. When I look at my favorite photos, they are the ones where my subject has taken up approximately 40-60% of the photo, like the photo bottom right as opposed to the photo bottom middle. This also helps with getting your subject in clear focus and a blurry background, but that’s something I’ll go into detail on in the Guide!

Notice that everything I shared here had nothing to do with the quality of the camera and everything to do with how you use it and take care of it. Practice these tips and tricks and watch your phone photography skills improve!
If you’re looking for a little more creative direction for shooting with your phone, here’s a peek at what the Guide to Great Photos with your Smartphone will cover:
+How to frame a shot + location tips
+Best practices for quality images
+Tips for shooting in different lighting scenarios
+Tricks for sharp images and blurry backgrounds
+Closeups, motion shots & nighttime photos
+Best practices for photos of people & why you don’t need “portrait mode”
Update: for the duration of COVID19 Quarantine, you can grab this guide FOR FREE right here!! My gift to you!!
Happy photographing!!


[…] you enjoyed this post, you might also like THIS POST where I share some general smartphone photography tips and you may also want to download my free […]